Devise and sendgrid integration into rails 6
Devise is a flexible production-ready authentication system supported in rails. The authentication system basically consists of three functionalities i.e. Signup, Login, and Logout. Further, in Signup, the password has to be a hashed password rather than a normal string and a confirmation link has to be sent on the registered email id for authenticating the user. In Login, a forget password functionality has to be there for recovery of password, and remember me functionality has to be there for saving credentials of the user in browser cookies for providing auto-filled credentials.
Instead of coding all these functionalities from scratch, use Devise. It is pre-equipped with all these functionalities and all of it can be accomplished by just installing the Devise gem. Devise is used extensively with so many functionalities that can be customized but in this article, I will only write about authenticating the registered user through a verification link. After registration, a verifying link has to be sent on the registered email id of the user On clicking it the user can verify himself.
HOW TO ACHIEVE THIS?
Well, we know that all these email operations are performed by the SMTP(Simple Mail Transfer Protocol) server. However, to set up an SMTP server for a beginner is quite back-breaking. Instead, we can use Sendgrid. SendGrid is a cloud-based SMTP provider that allows you to send email without having to maintain email servers. SendGrid manages all of the technical details and left you with just reaping the benefits of someone else’s effort.
LET’S CODE THIS
First, let’s include Devise gem and bundle install it in our gemfile.
gem 'devise'After bundle install. You need to run the generator:
rails generate devise:installThe generator will install an initializer which describes ALL of Devise’s configuration options. By default, there are no views and models . You have to generate them. Let’s now generate a model User
rails generate devise UserYou can also generate the corresponding Devise views.
rails generate devise:views usersYou can find a migration file that has been generated. Pull up that migration file and uncomment the 4 lines under confirmable:
t.string :confirmation_token
t.datetime :confirmed_at
t.datetime :confirmation_sent_at
t.string :unconfirmed_email
Pull up the user.rb model file under app/models and in the line for devise, add in a:
:confirmable, after :registerable, entry Run your migration now to create the users table
rails db:migrateDevise will create some helpers to use inside your controllers and views. To set up a controller with user authentication, just add this before_action
before_action :authenticate_user!Now, Let’s hop onto sending email in production
for beginners, we are using Heroku as a production server. First add in your credit card details to your heroku account.(Don’t worry this will not cost you a penny). Then enter in:
heroku addons:create sendgrid:starterThis will add a sendgrid addon in your deployed heroku project. You can login to your sendgrid account through this addon and in your sendgrid account menu you have to create an API key. After creating an API key, Now, we have to set the sendgrid apikey credentials you created for heroku.
heroku config:set SENDGRID_USERNAME=apikey
heroku config:set SENDGRID_PASSWORD=enterintheapikey
In the SENDGRID_PASSWORD you have to enter the API key that you have created from sendgrid above Rails provide you to securely store your API credentials in your credentials.yml file. All the data inside this file is encrypted so security is ensured. The encrypted credentials.yml.enc file will be decrypted in production, using a key stored in the RAILS_MASTER_KEYenvironment variable For people using the VS Code as an editor. You can edit the credentials.yml file by enabling the edit mode as below
EDITOR='code --wait' rails credentials:editAfter issuing this command you can store your Sendgrid credentials in this file
 sendgrid:
   user_name: apikey
   password: Your API key
Under config/environment/production.rb file add in the following code
 ActionMailer::Base.smtp_settings = {
      :address => 'smtp.sendgrid.net',
      :port => '587',
      :authentication => :plain,
      :user_name => Rails.application.credentials.dig(:user_name),
      :password => Rails.application.credentials.dig(:password),
      :domain => 'heroku.com',
      :enable_starttls_auto => true
    }

    config.action_mailer.delivery_method = :smtp
  config.action_mailer.default_url_options ={:host => 'yourherokuapp.herokuapp.com', :protocol => 'https'}
Now update the development.rb file under config/environments folder and add the following lines
 ActionMailer::Base.smtp_settings = {
      :address => 'smtp.sendgrid.net',
      :port => '587',
      :authentication => :plain,
      :user_name => Rails.application.credentials.dig(:user_name),
      :password => Rails.application.credentials.dig(:password),
      :domain => 'heroku.com',
      :enable_starttls_auto => true
    }

    config.action_mailer.delivery_method = :smtp
    config.action_mailer.default_url_options ={:host => 'http://localhost:3000'}
This setup configuration is both for production and development environment.
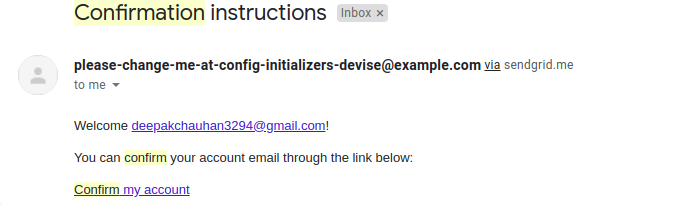
Now it is all set up. When you sign up now sendgrid will send a verification link to the registered email of the user. The confirmation link will look something like this.
If you want to redirect the user to a specific url after they clicked the link in the confirmation email, override the after_confirmation_path_for in your confirmations_controller:
Create a new confirmations_controller.rb in app/controllers directory:
class ConfirmationsController < Devise::ConfirmationsController
  private
  def after_confirmation_path_for(resource_name, resource)
    sign_in(resource) # In case you want to sign in the user
    your_new_after_confirmation_path
  end
end
In config/routes.rb, add this line so that Devise will use your custom ConfirmationsController. This assumes Devise operates on users table (you may edit to match yours).
devise_for :users, controllers: { confirmations: 'confirmations' }
Restart the web server, and you should have it.